Showing posts with label dessert. Show all posts

Tuesday, November 20, 2012

Ridiculously Healthy & Light Pumpkin Pie with Flaxseed Crust


Today's recipe comes just in time for Thanksgiving! I'll be making our Thanksgiving dinner again this year. And just like last year unfortunately, it will also be away from all my family and friends. Besides them, one of the things I miss most about home is just being able to step out onto my porch and breathe in the autumn air, the smell of pine trees and smokey backyard bonfires wrapping around me like an old, familiar blanket. Every year without fail, as soon as September rolls around I have this strong urge to PUMPKIN ALL THE THINGS. Like Pavlov's dogs, there's something about the crisp fall air that immediately makes me want to ravenously consume pumpkin yummies and drink hot pumpkin spiced lattes. Even though the smell of fall is absent here, my body is still wired to want pumpkin things around this time. And what better way to get my pumpkin fix than in the form of the traditional pumpkin pie? 

I've seen many gluten-free recipes that use nuts for the crust, and while I definitely agree that nut crusts are delicious, they're also very calorie dense. Flaxseeds are a great alternative in my opinion, especially if you are having digestive issues - for constipation, a tablespoon or two of flaxseeds will help that right along! Even though most brands tout the abundance of omega-3s in each serving, it seems the body is not very efficient at converting the non-useable ALA form into the useable forms of EHA and DPA (the level of efficiency seems to be slightly better in women, probably due to higher levels of estrogen). There are other concerns about flaxseed that I've read around the paleosphere as well. Still, I like to use flaxseed in special occasional treats such as this.  If you do use flaxseed, always buy them whole and raw, never ground, and store them in the refrigerator. They go rancid very quickly, so only grind them right before using. 

Many pumpkin pie recipes are also filled with sugar and dairy. The recipe on the back of Libby's pumpkin pie puree uses evaporated Carnation milk in addition to a ridiculous amount of sugar. I'd rather not slip into a diabetic coma, so I decided to come up with my own recipe for pumpkin pie using less sugar but still just as delicious. You can always sprinkle more honey on top if it turns out not sweet enough. In addition, I always taste my mixture and make sure it's to my liking before I pour it into the pan. I ain't scared of no raw eggs.

Pumpkin pie is really just a firm custard in a crust, and the basic recipe for a custard is eggs and milk with some sweetener to taste. I cut up a pumpkin and roasted the pieces, and I was able to save enough of them from going into my mouth to make some pumpkin filling, which ended up being about 200g worth of pumpkin. I made about 5 pies before deciding on the final recipe. Each time I didn't bother to measure anything except for the pumpkin, and every time the pie turned out great. You really can't mess this up!


A dollop of yogurt, cocoa powder and chocolate shavings make it look fancy-schmancy. 


LIGHT PUMPKIN CUSTARD / PIE WITH FLAXSEED CRUST

What you'll need

For the crust:
  • 16 Tbsp / 1 cup whole raw flaxseed
  • 1 egg
  • 1 Tbsp / 15g butter (you can also use a Tbsp of coconut oil)
  • 3 tsp cinnamon
  • Optional: 1-2 tsp honey (can also use 1-2 tsp sugar)
For the pumpkin pie filling:
  • 220g / ~ 1 cup cooked pumpkin pieces, or pumpkin puree. I used roasted pumpkin pieces.
  • 1 large egg
  • 100ml / 1/2 cup canned coconut milk (can also use whole milk)
  • 1/4 tsp salt
  • 1 tsp vanilla extract
  • Optional: 1-3 Tbsp sugar / honey, depending on how sweet you prefer your pie.
  • Optional: 1 tsp potato starch for a firmer pie filling. I didn't use Libby's pumpkin puree but if you are, I would use the potato starch since I think the canned puree is more liquidy.
  • ~ 1 1/2 Tbsp of your pumpkin pie spice mix. If you don't have it ready made, you can use mine below. Honestly though, I usually don't have any premade nor do I bother measuring - I just throw dashes of spices in here and there and it always comes out delicious!
Pumpkin spice mix:
  • 2 tsp cinnamon
  • 1/8 tsp cloves
  • 1/4 tsp nutmeg
  • 1/4 tsp ginger
  • 1/3 tsp ground cardamom (If you have some. Not necessary, but I love the flavor of cardamom!)
  • 1/4 tsp allspice

Directions

Crust:
  1. Melt the butter and let it cool before whisking it with the egg. 
  2. Grind the flaxseeds, then mix it well with the cinnamon, egg and butter, and sugar / honey if you opt to. 
  3. Press the mixture into a 9" tart pan / quiche pan (I used HIC Porcelain Round Quiche Dish and had quite a bit of the mixture left over, which I later pressed into ramekins and made mini pies!).
  4. Bake at 170 C / 335 F for 8-10 minutes and keep an eye on it, until it is slightly browned and set. Don't overcook it! Let it cool.
Filling:
  1. This is easy. Throw everything together in your blender (I used my Magic Bullet) and blend until smooth. If you don't want to use your blender and the pumpkin puree is smooth enough, you can whisk everything in by hand. 
  2. Pour the filling into your crust, and bake at 175 C / 350 F for 30-40 minutes until set. The middle should barely jiggle when shaken. If it starts browning on top during baking, place some aluminium foil loosely on top.
  3. Let cool, then serve. I've found that chilling it over night works best, but it tastes yummy when  warm too. 

Nutritional Breakdown
With flax seed crust, canned coconut milk and honey:

Per slice
Whole pie
Calories
90
720
Protein
5.5 g
44 g
Fat
6 g
48 g
Carbs
7 g
56 g

This is also firm enough to make without the crust and eat it as a custard, which I have been doing for the past few weeks! If making it without the crust, the nutritional breakdown is as follows:

Per slice
Whole pie
Calories
38
304
Protein
2.3 g
18.4 g
Fat
2 g
16 g
Carbs
5 g
40 g

Some additional notes:
- For a protein packed pie, replace the sugar with some vanilla whey protein. You might have to add a bit more milk if you do.
- If you add too much potato starch, the custard might end up almost bread-like. I've found that when I use whole pumpkin pieces, the pumpkin has enough starch to hold it together and I never need potato starch.
- You can use a pan / quiche dish larger than 9". If you do and you are afraid that the mixture isn't enough for your pie, you can add up to a cup more of pumpkin puree / pumpkin pieces and a bit more milk without affecting the overall recipe.
- I used a smaller oven, so baking times may vary! Keep an eye on your pie.

Sunday, July 15, 2012

Basic & Easy Chocolate Truffles with Goat Cheese (Make them latte, banana-rum, cinnamon, or just plain flavored!)


So I'm back from my 3 month vacation to the US, hence the long hiatus in my blog. While back, I discovered The Fresh Market had opened up right in my town, across from Trader Joe's. The Fresh Market has officially replaced TJ's as my favorite grocery store (although TJ's is still a close second! And I just love the people who work there!). I also went to the beach a couple times, laid out for hours and got a tan that will last me for the rest of the year. On my last night there, my besties and sister gorged ourselves silly on crabs. Can't leave Baltimore without picking crabs smothered in Old Bay! Anyway, it felt so great to be back home with friends and family, but now I'm back and ready to share some more recipes!

These truffles are something I've been making for awhile now. I've seen a lot of recipes out there for raw brownies / truffles using dates as the sweetener, but most of them use a good bit of ground nuts, or melted chocolate, or heavy cream. Which is great, there's nothing wrong with using those ingredients. However, I try not to consume too many nuts for the sake of my omega 6:3 ratios. And sometimes (okay, most of the time) I just don't feel like setting up a double boiler to melt some chocolate. Also if I'm going to eat dark chocolate, I like to slowly savor a piece of 99%+ in my mouth, letting it melt as I bask in hedonistic joy, and then wash it down with a glass of red wine.

I got the idea of using goat cheese with these truffles while looking for recipes using dried dates, since we had bought a whole bag of them. Saw some recipes for some goat cheese stuffed dates, and I figured goat cheese and dates were a good match. I wondered if I could incorporate goat cheese and dates in a raw truffle. Tried it out, and I was right! The truffles are pretty primal / paleo friendly, unless you aren't eating goat cheese. Here's Mark's stance on cheese. I allow myself some goat cheese from time to time. Dates are a high fructose food and high in sugar though (as most dried fruits are), so if you are in the middle of leaning out and trying to lose body fat, don't overdose on these!

This recipe is pretty simple, you can't really mess it up. But it tastes like a bona fide gourmet truffle. The goat cheese is what really gives it its depth of flavor and richness. You can't really taste the goat cheese, but you can taste hints of the distinctive tartness that goat cheese has. It melds together so wonderfully with the cocoa. The first time I made these, I just threw some chopped up dates in my magic bullet, eyeballed about a tablespoon of goat cheese, and kept throwing some cocoa powder in there until it had the consistency I was looking for. And really, I never measure anything out when I make these. I just add stuff here and there until it's just right. So for the recipe below, you can measure everything out to the exact tablespoon, or you can just eyeball it and add more of this and that until it's perfect. I like keeping my recipes nice and simple.


The recipe below is more like a base for the truffles. I've added different things and made many different variations of these, and all have turned out fantastic.

EASY CHOCOLATE TRUFFLES WITH GOAT CHEESE

What you'll need:

  • Magic Bullet or food processor (I used my Magic Bullet)
  • ~ 1/4 cup unsweetened cocoa powder, plus more in a little bowl for dusting
  • ~1-2 Tbsp Goat cheese
  • Dried medjool dates (about 13-14, coarsely chopped)
  • Optional: Chopped nuts (I used macadamia nuts) in a little bowl to cover the truffles
  • A little bit of cream, yogurt, or milk to soften up the paste if need be

Directions:
  1. Place the dates, about 1 Tbsp of goat cheese, and half of the 1/4 cup of cocoa powder in your Magic Bullet / food processor. Pulse until a ball forms, or until it comes together and most of the dates aren't into chunks anymore. The consistency should be kind of mushy, but not too overly wet that you can't shape it into a small ball. If it's too sticky / wet, add more cocoa powder and pulse again until it's the right consistency. If it's too dry, add a tiny bit of cream / yogurt / milk. Use a rubber spatula to scrape down the sides.
  2. Wet your hands, and depending on how big you want your truffles, take about 1/2 a Tbsp or 1 Tbsp of the mixture and roll it into a ball. Drop it in the small bowl of cocoa powder and shake the bowl around until the truffle is covered in the cocoa powder. You can also cover it in the chopped nuts instead. 
  3. Take the truffle out, and place on a plate or on wax paper. Repeat until you use up all the mixture. 
  4. Chill in the refrigerator for a couple hours until set.


There are so many different variations of these truffles that you can make. 
  • For a latte-esque truffle, add a bit of instant coffee powder, vanilla extract, cinnamon and ground cardamon.
  • Feeling in the mood for s'mores? Add some marshmallows to the mixture when you are pulsing, and roll the truffles around in crushed graham crackers. And how about Oreos? Rolling them around in crushed Oreos may be non-paleo, but definitely tasty. 
  • For a fancy adult treat, add a bit of mashed banana, dark rum, and roll the truffle around in flaked coconut.
The possibilities are endless. What truffles will you make?


Wednesday, February 15, 2012

Simple Flour-less Protein Chocolate Banana Cake - No Gluten, Sugar, or Butter!


This cake is my new favorite obsession. It's sooooo freaking good, and takes care of those days when I crave cake. When I got the idea to make this, I literally shouted "Eureka!" (but in my mind). Pure laziness prompted me to think of this cake. I was tired of cleaning my frying pan and spatula every time I made crepes, so I wondered to myself whether I could bake the same batter I use to make my crepes. Parchment paper-lined pans are way easier to clean up. And lo and behold, by tweaking the proportions a bit and adding / omitting a few ingredients here and there, it worked.

My cake uses no flours (not even almond or coconut flour!), no sugar, and no butter. The only carbs you'll get from this is from the banana. It's also super versatile. I make this every day, and I've experimented with many different spices. Scroll down below for a list of ideas that I've tried and liked! I love making this with cardamom the best, though.

This cake won't have the consistency of a regular cake. It's more moist inside. Depending on how big and ripe your banana is, your texture might vary. Also, if you use more whey protein / cocoa powder, it will be less moist. I used to eat it warm and straight from the oven, but because it started to remind me of a tiramisu (but not as wet) I got the idea to make a mascarpone filling and chill the cake. Best idea ever.

Just for funsies, I calculated the caloric content. One egg (70 cal), one banana (~70-100 cal), and one scoop of whey protein (~140 cal) = 310 calories for the entire cake, rounded up. Sweet (literally).


PROTEIN PACKED BANANA CAKE

Makes 2-3 servings, or 1 if you have fat kid days like me.

What you'll need:
For the cake:
  • One ripe banana
  • One egg
  • ~ 1 scoop of chocolate or vanilla whey protein (I used chocolate. I've used 1/2 a scoop for wetter, moister cakes and 1 scoop for a less moist cake)
  • ~ 1-2 Tbsp cocoa powder, unsweetned
  • ~ 1/2 Tbsp cinnamon
  • 2 cardamom pods, with the seeds crushed
  • 1/4 tsp baking soda
  • Optional: some chopped nuts (I've used macadamia nuts, almonds, and walnuts - they're all great)
For the filling (optional):
  • 1 spoonful of Greek yogurt 
  • 1 spoonful of mascarpone cheese  (or you can omit the mascarpone and use all Greek yogurt)
  • 1/4 - 1/2 tsp instant coffee powder

Directions:
For the cake: 
  1. Preheat your oven to 350 F / 175 C if you're using a metal pan, 325 F / 160 C if you're using a glass pan like I did. I used the 10x4 MIXTUR dish by IKEA. Line your pan with parchment paper.
  2. Mash up your banana really well in a bowl. Then mix the cardamom seeds and nuts (if you want) in.
  3. Whip the egg in a separate bowl, then use a fork to mix the egg into the bowl with the mashed banana until combined. 
  4. In a separate bowl, combine the whey protein, baking soda, cocoa powder, and cinnamon. Mix well.
  5. Fold the dry ingredients into the wet until just mixed well. 
  6. Pour the mixture into the pan. Bake in the middle rack for about 30-40 minutes, or until your toothpick test comes out clean. Meanwhile, prepare your filling if you want.
  7. When your cake is done, turn off the oven and open the door, and let the cake chill there for a minute. Then, take it out from its parchment paper home and set it to cool on a rack. You can either eat it plain, or read on if you want to do the filling. 
  8. When it's sufficiently cool (about 15 minutes), cut it into 2 or 3 pieces, then cut each piece in half lengthwise with a knife, and spread your mascarpone / yogurt mixture on the bottom half. Put the top half back on, and chill in the refrigerator until ready to eat. When I make this for other people, I like to sprinkle powdered sugar on top to make it look purdy. 
For the filling:
  1. This is easy. Combine the mascarpone, Greek yogurt, and instant coffee together in a small bowl, and whip with a fork until the consistency is to your liking. You can add more yogurt or mascarpone if you want. Or leave out the mascarpone and just use the Greek yogurt with the coffee! 
  2. Spread on your cake. 
Some variations that I've made of this cake that have worked out well:
  • Cut up an Earl Grey tea bag and mix in about 1/2 Tbsp dried tea leaves in the batter. I love Earl Grey, and it tastes great with the cake and spices. 
  • I've made this using 1 Tbsp of matcha too, and it turned out pretty good.
  • Use pumpkin spice instead of the cardamom. 
  • For an extra kick in the mornings, add some instant coffee powder in the batter.
  • Cut up an extra banana into slices and top the batter with them before you put it in the oven. Or use any other fruit you wish.
  • Put some dessicated coconut in the batter and / or sprinkle some sesame seeds on top before you bake.
  • When I use only 1/2 a scoop of whey protein, I up the cocoa powder to about 2-3 Tbsp.
  • Sometimes after cutting the cake in half lengthwise, I'll cut both halves into smaller pieces (to make about 24 pieces total), and re-bake in the oven on the rack at 200C for 5-10 minutes for deliciously crispy edges but a soft, warm, and chocolaty interior. Like mini cookies! This is probably my favorite thing to do with this cake. A small toaster oven is great for this, and the toasted cake tastes awesome with a glass of milk.
This was the cake I made for James on Valentine's Day.
Nutritional Breakdown
With one egg, one medium sized 105g banana, and 1 full scoop of whey protein:


Calories
315
Protein
34 g
Fat
11 g
Carbs
31 g

The banana contributes to the relatively higher carb content. Also, the ripeness of the banana will also impact your cake somewhat. A riper, mushier banana will result in a sweeter and slightly moister cake. You can keep the sweetness and add in some mashed sweet potato if you find the cake is too moist. A less ripe, starchier banana will result in a less sweet cake but perhaps not as moist.

Other notes:
  • I used a glass pan and baked it in a small oven. Around 165 - 175C is what worked for me. Depending on the type of pan you use and your oven, you may have to adjust your temperature. 
  • Again, like my Chai Banana Oat Cookies, depending on how big the banana you're using is, you might end up with a moister cake than you like. If that's the case, just slice it in half lengthwise and pop it back into the oven for about 5-10 more minutes, and it will be perfect. You can also add in some mashed sweet potato. Or use more protein / cocoa powder next time. I actually like these cakes to be more moist if I'm going to put mascarpone / yogurt in the middle and chill in the fridge, they have a wonderful texture to them after chilling. 

Friday, February 3, 2012

Easy Chai Spiced Banana Oat Cookies - Healthy, Simple, and Gluten Free!

I love cardamom. Love love LOVE it. My husband was in Saudi Arabia for business, and he came back bearing spices. Za'atar, sumac, cloves, mastic, etc ... and cardamom pods. I'm addicted to cardamom. I put it in everything - my tea, post-workout smoothies, and I've discovered it's absolutely amazing with banana and cinnamon.

I've been making my banana oat cookies for a few months now. While eating some baked oatmeal, I came across the simple idea of mashing a banana, mixing it with just oats, and baking it like a cookie. Oats aren't exactly paleo / primal, but they're not something I'm willing to cut out completely. I'll have it probably once a month or every other month, when I crave a cookie. Anyway, I started experimenting with different spices, and I think I've finally put together the perfect blend in this cookie.

This is seriously like a chai latte in a cookie. You don't need to add any sugar at all in these, if you're using ripe bananas. If you have a serious sweet tooth, then feel free to add honey or sugar if you want. 

If you don't have any cardamom lying around, you can still make these - but I highly recommend you invest in some cardamom. It makes a world of a difference. So does the added coffee in these.

By the way, to my friends who frequent my blog, Patrick and Susanna are biking the 4K for cancer - a 70 day 4000k mile bike ride from Baltimore to San Francisco. Please show your support!
Patrick's page
Susanna's page


EASY, SIMPLE AND HEALTHY CHAI SPICED BANANA OAT COOKIES

Depending on how big your banana is and how big you make your cookies, this makes about 6-12 cookies. If you use 1/2 cup Quaker Rolled Oats and a large 100 calorie banana, this whole batch is only 250 calories! That's 20 calories / cookie if you make 12 cookies, or 40 calories / cookie if you make 6 big cookies. I don't  normally count calories, but I know some people that do to help maintain their caloric intake, which can be very helpful! (Edit: It's just been brought to my attention that Quaker Oats are cross-contaminated. Thanks, Annie! If you have a severe gluten allergy, I recommend you check out Trader Joe's Gluten-Free Rolled Oats or another brand that you are familiar with)


What you'll need:
  • One banana, mashed
  • ~1/4 - 1/2 cup of non-contaminated gluten-free rolled oats, depending on how big your bananas are (I usually use only 2 Tbsp to cut down on my carb intake, but you can use up to 3/4 cup for crispier cookies. When I make these for people, I use about 1/2 cup whole rolled oats in addition to 1/4 ground oats).
  • One cardamom pod or you can use 1/4 tsp ground cardamom
  • 1/4 tsp baking powder
  • 1/4 tsp cinnamon
  • Pinch of nutmeg
  • Pinch of cloves
  • 1/4 tsp vanilla extract
  • Optional: 1/4 tsp instant coffee powder and a couple pieces of chocolate, or 4-5 pieces of Trader Joe's Dark Chocolate Covered Expresso Beans, chopped. The coffee adds a complex flavor and really makes it taste like a chai latte, so I highly recommend adding it!
Directions:
  1. Remove the cardamom seeds from its pod and crush with a mortar and pestle, or you can be ghetto fab like me and use a spoon to crush it. Preheat the oven to 340F / 170C if you're using 1/4 cup of oats or less, ~ 365F / 185F if you're using 1/2 - 3/4 cup of oats for crispier cookies. 
  2. Mash the banana. Add the vanilla extract. Sprinkle the crushed cardamom seeds in, add the cinnamon, nutmeg, cloves, and baking powder, and mix well. 
  3. If you choose to, add the coffee and chocolate / chopped TJs chocolate expresso beans, and mix in. 
  4. Fold in the oats until just mixed - do not over mix! The dough will be wet.
  5. Scoop them by small spoonfuls onto a parchment lined baking sheet, and bake for ~20-30 minutes, until they start to brown or until the texture is the way you like them. These smell amazing when baking.
  6. Eat them straight from the oven with milk. Try to restrain yourself from eating the whole batch.

Since I don't use a lot of oats when I make these, mine tend to be very very soft, and perfect with a glass of milk. If you use more oats, yours will be crispier on the outside but still moist on the inside! Be careful if you decide to make these - they are very addictive.


Thursday, February 2, 2012

Healthy and Gluten-Free Cinnamon Persimmon Cookies (Only 4 Ingredients!)

Persimmons are amazing. They're delicious. My parents started growing a bunch of fruit trees in their backyard while I was growing up, and now they have practically a whole orchard in the back of their house. Cherries, pears, peaches, plums, persimmons, tomatoes, different herbs, etc. My favorite out of all these? Persimmons. During late fall every year, we live in persimmon heaven. Lucky for us too, since persimmons are expensive where we are - I've seen them priced at $2-$3 each!

If you've never eaten a persimmon, put that on your bucket list. The taste is indescribable. Sweet and addictive. The riper they are, the better they taste. However, if they get too ripe, they get very mushy (some people prefer that texture; I prefer them more firm). Make sure you don't bite into an under-ripe one, though. Under-ripe persimmons have a higher tannin content and are more astringent. You'll get that dry and puckered feeling in your mouth. 

Persimmons, like most fruits, have many benefits. They're high in catechins, which are polyphenolic antioxidants. Why are catechins good? As you may already know, there are 5 main groups of lipoproteins. You've most likely heard of the two most common ones associated with cholestorol - LDL and HDL. HDL, or high density lipoprotein, is referred to as "good". LDL, or low density protein, is usually referred to as "bad". Catechins inhibits LDL oxidation, which is good - there are subcategories of LDL and it's oxidized LDL, not regular LDL, that clogs up your arteries. And contrary to popular belief, the levels of LDL rise with inflammation caused by consuming carbs and trans fats, not by consuming saturated fats. I'll stop here to prevent myself from preaching about the evils in consuming sugars and grains. You're here for yummy persimmon cookies, not a rant!

So. Persimmon cookies. I'm all for simplicity when it comes to making quick snacks. The less ingredients, the better. The idea of these cookies came to me while I was eating oatmeal. I mashed up a persimmon and mixed it into my oatmeal one morning, had a sudden craving for cookies, and thought to myself ... I need this oatmeal to be in cookie form. These cookies are perfect when you have a sudden craving for some fruit but in a nice warm cookie form without all that excess sugar. These are low glycemic, so they won't spike your blood sugar like most cookies. And they are so incredibly simple and easy to make! I didn't add any sugar because my persimmons were pretty sweet, but you can if you want.

I made two versions. Both are gluten free, one is made with oats, one without oats for those eating paleo / primal.

Cinnamon Persimmon Oat Cookies

Makes about 4-6 cookies, depending on how big they are. This recipe can easily be doubled / tripled. 

What you'll need:
  • One very ripe and mushy persimmon
  • 1/4 tsp baking powder
  • 1/4 cinnamon, more or less to taste
  • 1/3 cup of non-contaminated gluten-free rolled oats (check out Trader Joe's gluten-free oats) and 2 Tbsp of almond flour, or you can just use grind up 2 Tbsp rolled oats if you don't have almond flour. Alternatively, you can use 1/2 cup almond flour if you're primal / paleo
  • ~ 1/2 Tbsp honey (optional)
Directions:
  • Preheat the oven to 175 C / 340 F. Mash the persimmon with a fork or potato masher. I like using the potato masher, since I find it easier. I can also use it to scoop up the mixture to the baking sheet - which means one less utensil to wash at the end! 
  • Add the baking powder, cinnamon, and honey if you choose to, and mix well. 
  • Fold in the oats and almond flour until just mixed. Don't over-mix! The mixture will be wetter than normal cookie dough.
  • Line a baking sheet with parchment paper, and scoop about a spoonful onto the sheet, leaving about an inch of space between each. 
  • Bake about 20 minutes, or until the tops begin to brown.
These cookies are incredibly moist on the inside and slightly crispy on the outside - just the way I like them! They're super healthy and are amazing when they're warm and right out of the oven.  


Tip: If your cookies come out too moist for your liking, there are a few things you can do. You can either pop them back into the oven. If they've already browned, then cover them with foil and bake at a slightly lower temperature until the texture is to your liking. You can also bake at 150 C / 300 F for about 30 minutes next time. Finally, you can also add about another 1/4 cup of ground / whole oats (in addition to the 1/3 cup of oats) to the mixture next time you make these. 


If you like these, check out my Chai Spiced Banana Oat Cookies!

Sunday, January 15, 2012

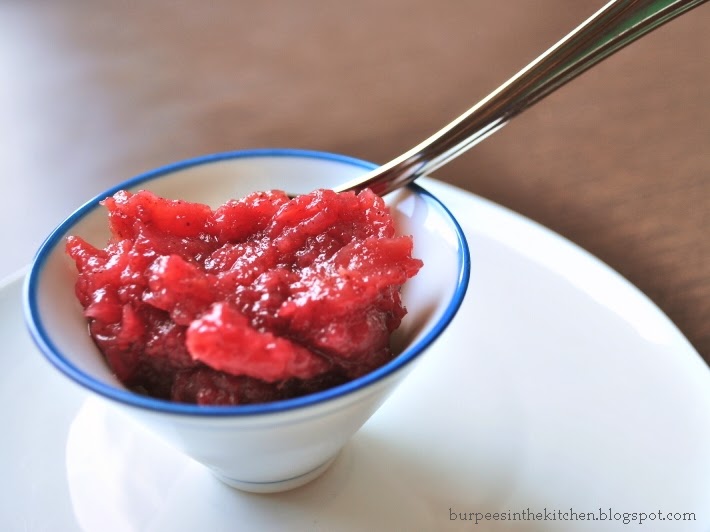
Spiced Baked Cranberry Applesauce

Applesauce is so versatile. It can be eaten as a side dish with pork chops, dessert, used in baking cakes, anything you can think of. I can't stand the commercially mass produced applesauce like Mott's. Although it does remind me of my elementary school days, the stuff tastes bland. Lacking in flavor and texture. So, I decided to make my own.

After scouring recipes for applesauce, I found that all of them cooked the apples by way of boiling them. I am not a fan of boiling fruits or vegetables; boiling leeches all the nutrients out of them, and I like to keep the nutrients in my food. The only time I would boil veggies would be if I were making soup and would be drinking the broth after. Otherwise, I like to find other ways of cooking my fruits and veggies. 

So, the idea came to me to bake the apples instead of boiling them. And since we had some frozen cranberries lying around, I decided to throw those in too. Best. Idea. Ever. 


Baked Cranberry Applesauce

What you'll need:
  • 2 apples, cored, peeled, and diced / sliced. I used Fuji apples. It doesn't matter what  kind of apples you use. Use your favorite!
  • Some cranberries. Use as much or as little as you want, depending on preference. The more you use, the more tart your applesauce will be. I used about 1/2 a cup. 
  • ~ 1/2 - 1 tsp cinnamon
  • Pinch of cloves 
  • Pinch of nutmeg
  • 1/4 tsp vanilla
  • Optional: Honey. Apples are naturally sweet, so I didn't use any. However, if you have a real sweet tooth, go ahead and drizzle some honey on there!
  • Optional: 1/2 Tbsp orange zest
Directions:
  1. Toss the diced / sliced apples and the cranberries into a nonstick baking pan or line a baking pan with parchment paper. 
  2. Sprinkle the cinnamon, nutmeg, and cloves over the mixture, 1/4 tsp vanilla, and drizzle the honey if you choose to, as well as the orange zest. Mix it all up. 
  3. Cover with foil, and bake at 360F for 45 minutes or until you can easily mash them with a fork.
  4. After they're done baking, take them out and get to mashing! Mash them with a fork until you get your desired texture. I like my applesauce on the chunky side. Alternatively, you can puree it in a blender / food processor / Magic Bullet if you like your applesauce smooth.
  5. You can eat it warm, or chill in the refrigerator until ready to serve. Keeps up to 5 days. 


Sunday, December 25, 2011

Gluten-Free Chocolate Sauerkraut Brownie Drops

I know what you're thinking. Sauerkraut? In a dessert? With chocolate?

Well, we ended up having a crapload of sauerkraut leftover from Christmas dinner. What to do? Obvious answer: make something yummy! I call these brownie drops because they looked like tiny bite-sized cookies, but the texture reminded me of a moist and rich brownie! Also, these require at most 4 Tbsp of honey and not that much butter - and they were still a big hit with the husband! I didn't tell him it was made with sauerkraut until he inhaled about 4 of them.

Gluten-Free Chocolate Banana Sauerkraut Brownie Drops *
(Will satisfy any sweet and chocolate cravings you have in no time, and better for you than a regular piece of brownie / cookie!)

*Adapted from Joanie Grow's recipe. I used her recipe as a base, but changed most of the ingredients and added my own. I cut her recipe in half, substituted a bunch of ingredients for others to make it more primal, and since we were out of eggs I mashed up half a banana and used that instead. I cut down on a lot of of the sugar / honey, since I try to avoid high spikes in blood sugar when possible. Plus, you'll get extra sweetness from the banana. I'm so glad I used the banana instead of the egg - banana and chocolate go SO well together. I also cut down on the butter. You seriously do not need that much butter!

 What you'll need: 
  • ~ 1 Tbsp butter
  • ~ 2-4 Tbsp honey
  • 1/2 banana, mashed
  • 1/2 cup sauerkraut, rinsed, drained well, and chopped
  • 1/2 tsp. vanilla extract
  • 1/2 cup uncontaminated rolled oats, coarsely ground (or almond flour, if you're strictly paleo / primal)
  • 1/4 cup almond flour
  • 2 - 3 Tbsp cocoa powder
  • 1/2 tsp. baking powder
  • 1/4 tsp. baking soda
  • 1/8 tsp. salt
  • 1/4 tsp. instant coffee (optional, but I strongly recommend it - gives it a nice kick and more complex taste! I tend to always add some coffee to recipes that use bananas. They just go so well together, at least for me).
Directions:
  1. Preheat the oven to 325 F. First, cream together the butter and honey. I didn't measure out the honey, I just sort of eyeballed it and drizzled it in, probably used at most 3 Tbsp. Add enough to your liking.You don't need to add a lot, since honey is very sweet and wetter than sugar, and you're also getting extra sweetness from the banana. You'll also be able to taste it later and adjust accordingly.
  2. Add the mashed banana to the creamed butter and honey, and mix together.
  3. Add the sauerkraut and vanilla extract and mix together (make sure you dry the sauerkraut well with paper towels).
  4. Mix the ground oats, almond flour, cocoa powder, baking powder, baking soda, salt, and the instant coffee together in a separate bowl. Then stir the dry ingredients into the wet ingredients until just well blended. The good thing about this recipe is that there are no raw eggs, so you can taste the batter and add more honey if you think it's not sweet enough.
  5. Drop into round little balls onto a baking sheet lined with parchment paper (or onto a nonstick cookie sheet). Bake at 325 F for ~12 - 15 minutes (mine took about 14 minutes). Top with your choice of nuts, if you want.
Makes about 20. Alternatively, you can make little muffins out of them, which is what I ended up doing for the second batch after my husband tasted them. He expected them to have the consistency of a cookie but when we bit into them, they were incredibly soft and tasted more cake/brownie-like. The sauerkraut added a luscious, moist texture to them, and it doesn't taste anything like sauerkraut at all! It was so chocolately and practically melted in my mouth. Perfect with a glass of milk. Seriously delish.


I know the recipe isn't exactly primal / paleo because of the oats, but I have not been able to cut out oats completely from my diet yet! I think using all almond flour would work just as well (if you don't have almond flour and you're not eating paleo / primal, using all ground oats would work just as well or all-purpose flour).

Wednesday, November 9, 2011

Nutella Tofu Mousse

I wanted to devote one blog to updating my friends and family about my life on the other side of the world, and have another devoted to fitness and food / good nutrition - two of the four passions in my life.

The other two passions? Friends and science. And unfortunately I have not been able to have them in my life recently because of my big move. However, working out and cooking helps!

I'll kick off my first post with one of my favorite desserts ...

Nutella Tofu Mousse


What you'll need:
  • 1 block of tofu (firm tofu willl give you stiffer mousse, soft / silken tofu will be more of a pudding) 
  • 1 Tbsp of Nutella (add more or less, depending on taste) 
  • ~  2 Tbsp warm coconut milk (or you can use any other kind of milk - almond, soy, cow)
Directions:

Combine everything in the food processor or your Magic Bullet using the cross-blade, and blend until smooth. Put in a container, place in the refrigerator, and let it sit for at least 5 hours. I crushed pistachios and sprinkled them on top, and had a piece of 85% Lindt dark chocolate. Heavenly.

Notes:
 I found that the Nutella kept sticking to the side of the bullet, so I had to keep pushing it down on the side. I also boiled some water in a saucepan and turned the bullet upside down, and placed it in the water for a few seconds so it would warm up a bit and mesh together quicker. Did that a couple times.

 The mousse tasted delicious, and I didn't feel guilty eating it!

* Tofu contains phytic acid, which interferes with nutrient absorption. So eat in moderation! Here's a link to some more information about soy and tofu products. I've actually cut out tofu and soy milk from my diet, but I will make this for special occasions.